The world of LEGO Minecraft offers a unique blend of creativity and block-based building, allowing fans to bring their favorite game to life in a tangible way. Building a LEGO Minecraft village house is a fantastic project for both seasoned builders and newcomers to the hobby. Crafting your own design allows for unparalleled personalization and the opportunity to showcase your unique vision of the Minecraft world. This exploration into building will provide inspiration, tips, and ideas to help you create a truly exceptional LEGO Minecraft village house.
Planning Your LEGO Minecraft Village House
Before you start clicking those bricks together, a little planning goes a long way. Consider these factors:
- Size and Scale: How big do you want your house to be? Consider the minifigure scale and the overall footprint you want it to occupy.
- Materials: What blocks do you have available? Inventory your LEGO collection to see what colors and shapes you have in abundance.
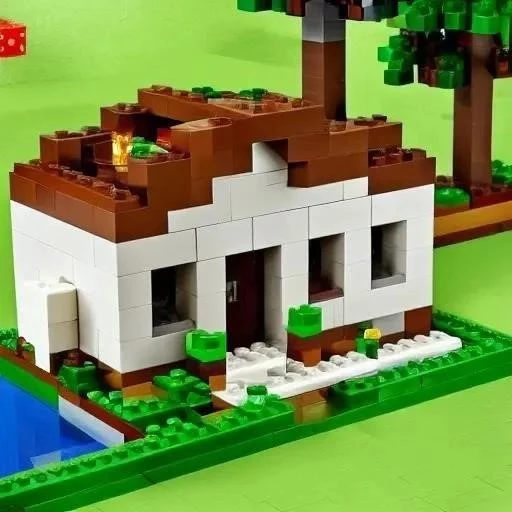
- Style: What kind of house do you want to build? A cozy cottage, a sprawling manor, or a modern glass structure? Think about the architectural style you want to emulate.
- Functionality: Will your house simply be for display, or will it have playable features? Consider adding hinged doors, opening windows, or removable roofs for access to the interior.
Design Inspiration: Beyond the Official Sets
While the official LEGO Minecraft sets offer a great starting point, don’t be afraid to venture beyond their designs. Look at real-world architecture, other LEGO creations online, or even screenshots from the Minecraft game itself. Some ideas to consider:
- Overhangs and Rooflines: Experiment with different roof angles and overhangs to create visual interest.
- Texture and Detailing: Use different brick types and layering techniques to add texture to the walls and surfaces. Consider using tiles for smooth floors, or studded bricks for rougher walls.
- Color Palettes: Explore different color combinations to create a unique aesthetic. Think about using contrasting colors for the walls and roof, or sticking to a monochromatic scheme for a more modern look.
- Landscaping: Don’t forget the surrounding landscape! Add trees, flowers, fences, and pathways to create a realistic and immersive environment.
Advanced Building Techniques
For those looking to take their LEGO Minecraft village house to the next level, consider these advanced building techniques:
SNOT (Studs Not On Top)
SNOT techniques allow you to attach bricks in directions other than the standard vertical orientation. This can be used to create smooth surfaces, angled walls, and intricate details.
Offsetting and Jumbling
Offsetting bricks by half a stud can create interesting textures and patterns. Jumbling different brick types together can add a sense of randomness and organic feel to your build.
Greebling
Greebling refers to adding small, often random details to a surface to make it look more complex and realistic. This can include adding small tiles, clips, or other small elements to create a sense of depth and texture.
Example: A Comparative Table of Building Materials
| Material | Pros | Cons | Best Used For |
|---|---|---|---|
| Smooth Tiles | Clean look, good for floors and roofs | Can be slippery, limited texture | Floors, roofs, modern designs |
| Studded Bricks | Good grip, versatile, classic look | Can look too blocky for some designs | Walls, foundations, general construction |
| Slopes | Excellent for roofs, smooth transitions | Can be difficult to integrate seamlessly | Roofs, angled surfaces |
Ultimately, the best approach to creating your own LEGO Minecraft village house is to experiment, be creative, and have fun. Don’t be afraid to try new techniques and break the rules. With a little planning and imagination, you can create a truly unique and impressive LEGO Minecraft creation. Remember to let your creativity flow and allow your personal Minecraft experiences to guide your build. Embrace the challenge of building and soon you will have a magnificent LEGO Minecraft village house to display and enjoy.
Documenting your progress can be beneficial, especially for larger builds. Taking photos or videos of each stage allows you to track your decisions, identify potential issues, and share your creation with others. Consider using a building app to create digital instructions for your design, or simply keep a sketchbook to jot down ideas and sketches. This will not only help you stay organized but also provide a valuable record of your creative process.
Adding Interior Details
Once the basic structure of your LEGO Minecraft village house is complete, it’s time to focus on the interior. This is where you can truly personalize your build and bring it to life. Consider adding furniture, decorations, and other details that reflect the character and purpose of the house.
- Furniture: Craft beds, tables, chairs, and storage chests using various LEGO bricks and plates. Experiment with different designs and colors to create a unique look.
- Decorations: Add paintings, plants, and other decorative elements to personalize the space. Use tiles to create artwork or build miniature LEGO plants to add a touch of greenery.
- Lighting: Incorporate LEGO light bricks or create your own lighting solutions using transparent bricks and LED lights. This can add a dramatic effect and make your house stand out.
Integrating with Other LEGO Minecraft Sets
One of the great things about LEGO Minecraft is its modularity. You can easily combine different sets and creations to build a larger and more complex village. Consider how your house will integrate with other LEGO Minecraft sets you may own. You might want to create a pathway connecting your house to a nearby farm or build a fence to enclose a garden.
Troubleshooting Common Building Challenges
Building with LEGO bricks can sometimes be challenging. Here are a few tips for overcoming common building problems:
- Stability: If your structure is wobbly, reinforce it with additional bricks or plates. Consider using Technic bricks and pins for added stability.
- Brick Separation: If you’re having trouble separating bricks, use a LEGO brick separator tool. These tools are designed to safely and easily separate even the most tightly connected bricks.
- Inspiration Block: If you’re feeling stuck, take a break and look at other LEGO creations for inspiration. Sometimes a fresh perspective is all you need to overcome a creative block.
With dedication, imagination, and a little patience, you can craft a truly remarkable LEGO Minecraft village house that reflects your own unique style and vision. The joy of building comes from the process of creation, so don’t be afraid to experiment, make mistakes, and learn along the way. Remember that the most important aspect is to enjoy yourself while building your very own LEGO Minecraft village house.
Expanding your LEGO Minecraft universe involves considering accessibility and playability. Ensure that minifigures can easily access all areas of the house and interact with the various features. This might involve creating wider doorways, adding ladders or stairs, or designing furniture that is appropriately sized for minifigures. Think about how you want to play with your creation and design it accordingly.
Beyond the Block: Expanding Your Creative Horizons
While LEGO bricks are the primary building material, don’t limit yourself to just bricks. Consider incorporating other materials to add texture, detail, and realism to your LEGO Minecraft village house. Some possibilities include:
- Fabric: Use small pieces of fabric to create curtains, blankets, or other decorative elements;
- Paper: Cut paper into shapes to create signs, posters, or other paper-based details.
- String: Use string or yarn to create ropes, fences, or other linear elements.
- Electronics: Integrate simple electronic components, such as LEDs or small motors, to add functionality and interactivity to your house.
Sharing Your Creation with the World
Once you’ve completed your LEGO Minecraft village house, consider sharing it with the world. There are many ways to showcase your creation and connect with other LEGO enthusiasts:
- Online Forums: Share photos and descriptions of your house on LEGO-themed forums and communities.
- Social Media: Post photos and videos of your creation on social media platforms like Instagram, Facebook, and YouTube.
- LEGO Conventions: Display your house at LEGO conventions and events.
- Local LEGO Clubs: Join a local LEGO club and share your creation with other members.
Sharing your creation is a great way to get feedback, inspire others, and connect with a community of like-minded builders. It’s also a rewarding experience to see others appreciate your hard work and creativity.
Preserving Your Masterpiece
After investing time and effort into building your LEGO Minecraft village house, you’ll want to ensure it’s well-preserved for years to come. Consider these tips for preserving your masterpiece:
- Dusting: Regularly dust your house to prevent dust buildup. Use a soft brush or a can of compressed air to remove dust from hard-to-reach areas.
- Storage: Store your house in a safe and dry place away from direct sunlight and extreme temperatures. This will help prevent fading and damage to the bricks.
- Disassembly: If you need to disassemble your house for storage or transportation, take photos or create instructions to help you rebuild it later.
By following these preservation tips, you can ensure that your LEGO Minecraft village house remains a cherished creation for years to come. Building a custom LEGO Minecraft village house is an experience that allows for creativity, problem-solving, and a deep connection to the world of Minecraft. With dedication and imagination, you can bring your digital world into reality, brick by brick.
Ultimately, the most satisfying aspect of designing your own LEGO Minecraft village house is the personal connection you form with your creation. It’s a tangible representation of your imagination, skill, and passion for both LEGO and Minecraft. So embrace the challenge, explore your creativity, and build a LEGO Minecraft village house that you can be truly proud of. By using your imagination, you can create anything.
Advanced Building Techniques for Experienced Builders
For those seeking an even greater challenge, consider exploring advanced building techniques to elevate your LEGO Minecraft village house. These techniques can add complexity, realism, and visual interest to your creation.
- SNOT (Studs Not On Top): This technique involves building sideways, allowing for smoother surfaces and more intricate details.
- Greebling: Adding small, seemingly random details to surfaces to create a sense of realism and complexity.
- Forced Perspective: Using the principles of perspective to create the illusion of depth and distance.
Experimenting with these techniques can significantly enhance the visual appeal of your LEGO Minecraft village house and set it apart from more basic builds. There are plenty of tutorials and resources online to help you learn these advanced techniques.
Designing for Functionality
Beyond aesthetics, consider the functionality of your LEGO Minecraft village house. Think about how the house will be used by the minifigures and incorporate features that enhance their play experience.
- Hidden Compartments: Incorporate secret compartments for storing treasure or other valuable items.
- Working Mechanisms: Add simple mechanisms, such as doors that open and close or a drawbridge that raises and lowers.
- Interactive Elements: Include interactive elements, such as a spinning water wheel or a working furnace.
Adding functional elements to your LEGO Minecraft village house will make it more engaging and enjoyable to play with.
Creating a Narrative
Give your LEGO Minecraft village house a story by developing a narrative around its inhabitants and their lives. This can add depth and meaning to your creation and make it more interesting to others.
- Character Backstories: Develop backstories for the minifigures who live in the house. What are their names, occupations, and personalities?
- Story Elements: Incorporate elements into the house that hint at the characters’ stories, such as a hidden diary or a dusty old map.
- Visual Storytelling: Use the design of the house to tell a story, such as a house that looks lived-in and well-loved or a house that appears abandoned and haunted.
By creating a narrative around your LEGO Minecraft village house, you can transform it from a simple collection of bricks into a compelling and engaging work of art.
And to make all of this even easier, there are countless websites that can help you design your village house. All of these can help make your house as unique as possible. Your LEGO Minecraft village house is more than just a toy; it’s an expression of your creativity, imagination, and passion for the world of Minecraft.
